Microsoft’s documentation doesn’t explain how to bulk update location targeting with zip codes in Microsoft Ads. This process is confusing, but it’s better than adding each zip code one by one.
Hopefully it saves you some time.
1. We need to find the “Microsoft location ID” for each zip code you want to target. This is necessary because Microsoft uses their own IDs to identify location targets, so if you want to add multiple zip codes at once, you need to know their corresponding IDs.
To do this, start by downloading Microsoft’s Geographical Locations Code file. You can find this in the Microsoft Advertising Developer Portal. A few language options are available, so choose the one applicable to you.

2. Open the Geographical Locations Code file in Excel or Google Sheets (it doesn’t matter which; the process works the same either way).
3. Add a second tab to the file. Paste the list of zip codes you want to target into the second tab, beginning with cell A1.

4. Go back to the first tab. Add a heading in column G. I’ve called it “Match” as you’ll see in the next image, but you can call it whatever you want.
5. Paste the following formula into the cell immediately below the heading you just added:
=SUMPRODUCT(--ISNUMBER(SEARCH(Sheet1!$A$1:$A$???,B2)))>0
In the formula, replace the three question marks with the cell number of the last row in the second tab.
For example, if I want to target 14 zip codes, then that’s how many zip codes are in the second tab, and it would end at row 14. I would replace ??? with 14. The formula would look like this:
=SUMPRODUCT(--ISNUMBER(SEARCH(Sheet1!$A$1:$A$14,B2)))>0

6. Copy the formula down so it applies to all of the cells in column G.

The logic here basically says “If any of the zip codes I want to target match the zip codes in Microsoft’s file, respond with TRUE”.
7. Add a filter. In column G, deselect “FALSE”. This will leave only the “TRUE” cells.

Congrats! That was the hard part. You now have all of the corresponding location IDs for the zip codes you want to target.
If you know another way to pull out the location IDs based on your target zip codes, go for it. There are always multiple ways to accomplish the same task with spreadsheets. This method works though, if you don’t know any others.
Note: You may notice that some of Microsoft’s location IDs do not have corresponding AdWords / Google Ads IDs. In my experience, Microsoft Ads will match more zip codes than Google Ads, so it’s worth doing this process rather than porting your location targets from Google Ads so you don’t miss any.
8. Open up your account in Microsoft Ads Editor.
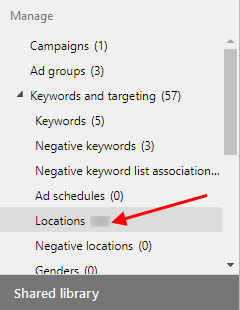
9. In the bottom left “Manage” panel, drop down “Keywords and targeting”, then select “Locations”.
10. In the secondary navigation at the top, drop down “Make multiple changes”, then click “Add/update multiple campaign area targets”.

11. Go back to your spreadsheet and copy all of the location IDs (the ones that are marked TRUE in column G) from column A.
Paste them into the Microsoft Ads window that just popped up. Deselect the box that says “My campaign locations data includes campaign names”, then check the applicable campaign(s). When you’re done, click “Next”.

12. Drop down the menu on the next screen and select “Target”, then click “Next”.

That’s it! Microsoft Ads Editor will process the request and provide a summary, then you can close the pop-up window and post the changes so they’re live in Microsoft Ads.